Ride Or Die Makeup!!!

Here I am. Bringing another challenge created on Youtube to my blog. Jaclyn Hill created the “Ride or Die Makeup Challenge” and I saw a couple of my favorite YouTubers create the challenge on their channels. Alissa Ashley’s was super cool, and she made it into a tutorial.

I loved doing this! As a makeup lover, I am always exploring new products and trying them out. But there is always a favorite, one that sticks out. When I began my blog, I mentioned my favorites so this is an excellent time to update my favorites and explain to y’all while I LURVE them.

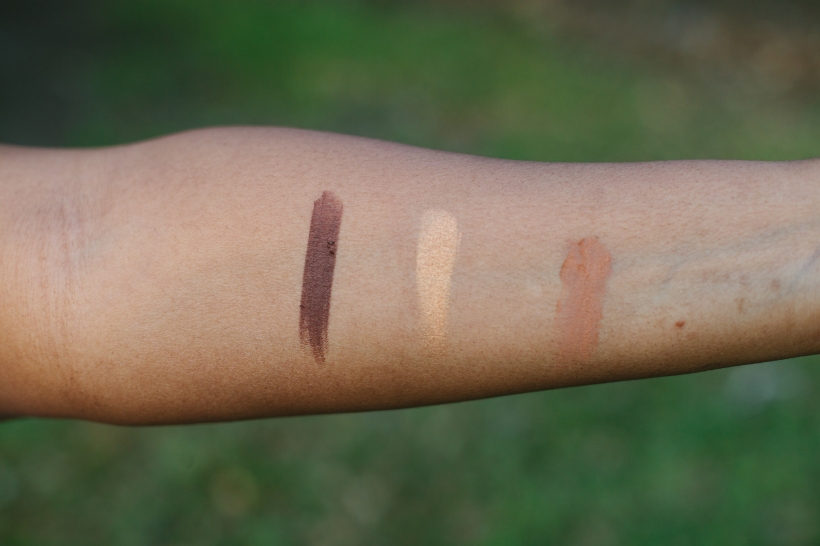
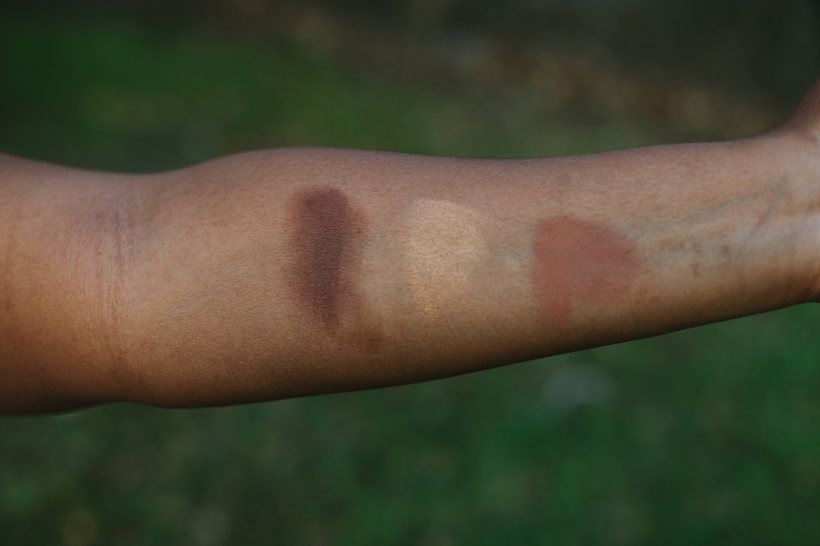
First things first. The base.

  • Foundation: NARS All Day Luminous Weightless Foundation in New Guinea. This foundation is EVERYTHING. It is so incredibly light weight and pigmented, I can hardly stand it. It lasts all day and the match is perfect.
  • Concealer: MAC Pro Longwear Concealer in NC45. This is the concealer I use to highlight. I have only been using it for a little more than two months, but the use has been religious. Generally, one pump of the concealer covers all of my highlighted areas and my sad, sad dark circles.
  • Bronzer: Bobbi Brown Bronzing Powder in Deep. Bobbi Brown, girl! You did that! I searched high and low and side to side for a bronzer that actually brought color to my face. I love this bronzer, and I fear the day I hit pan.
  • Contour: Makeup Geek Contour Powder in Half Hearted (Warm Medium) and Koyvoca’s Contour Stick in Aphotic. If I am going full tilt I cream contour and set it with the Makeup Geek Powder. I love the effect of cream contouring and feel slayful when I do it.
  • Setting Powder: Sacha Buttercup. NEED I SAY MORE. And for the rest of my face I use Mac Studio Fix Powder in NW45 and that adds more matte coverage for me.

Eyes.

  • Shadows: I always go to my Morphe 350. I know its famous upon the blogger community. But I adore a 3 step nude eye look with a wing.
  • Liner: For the aforementioned wing I use Kat Von D tattoo liner. Enough said, I will never use any other liquid liner.
  • Mascara: I am devoted to Too Faced, Better than Sex BUT in recent weeks I have stila Huge Extreme Lash Mascara has captivated me.


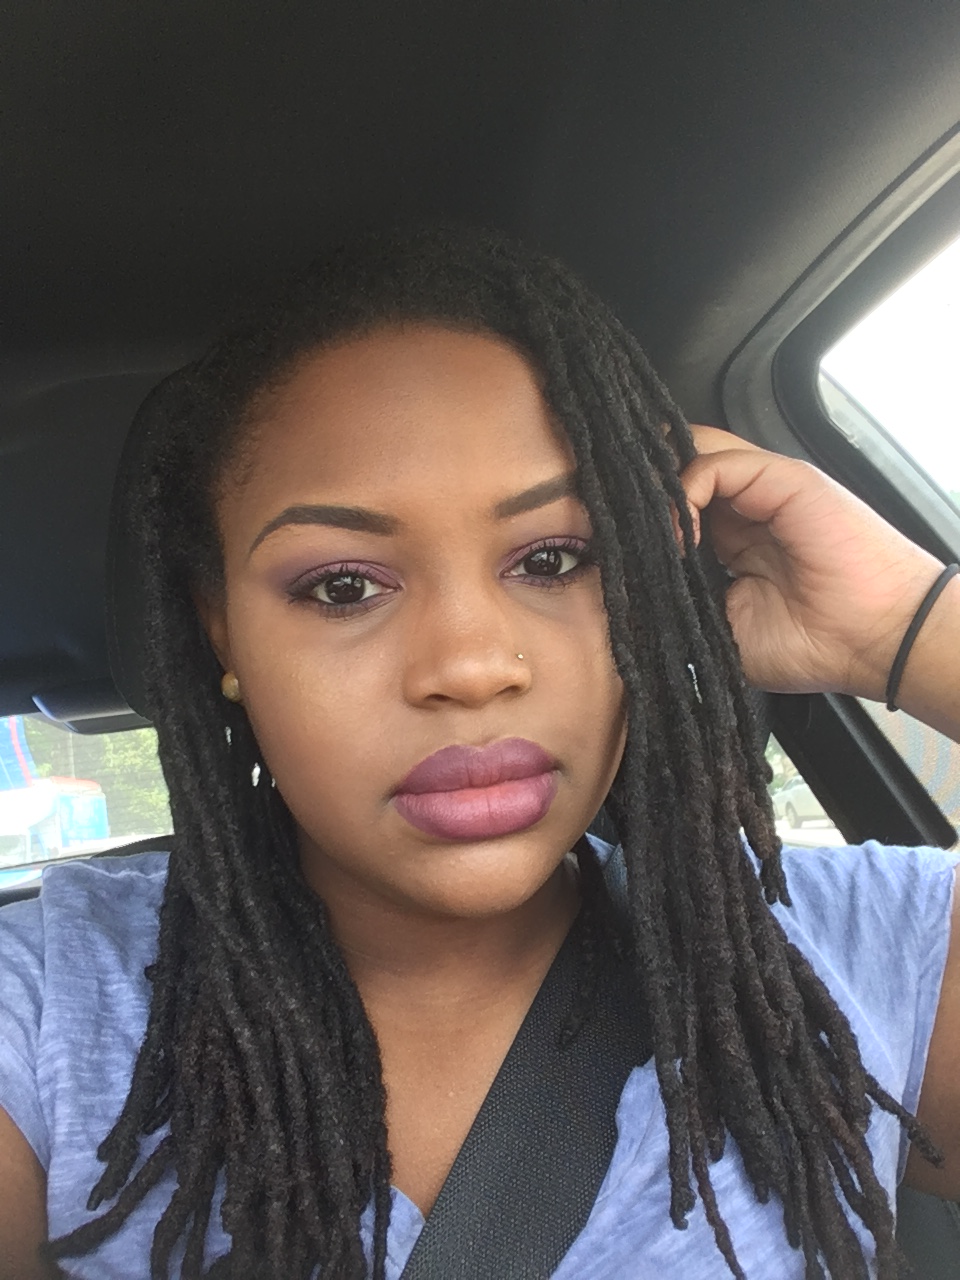
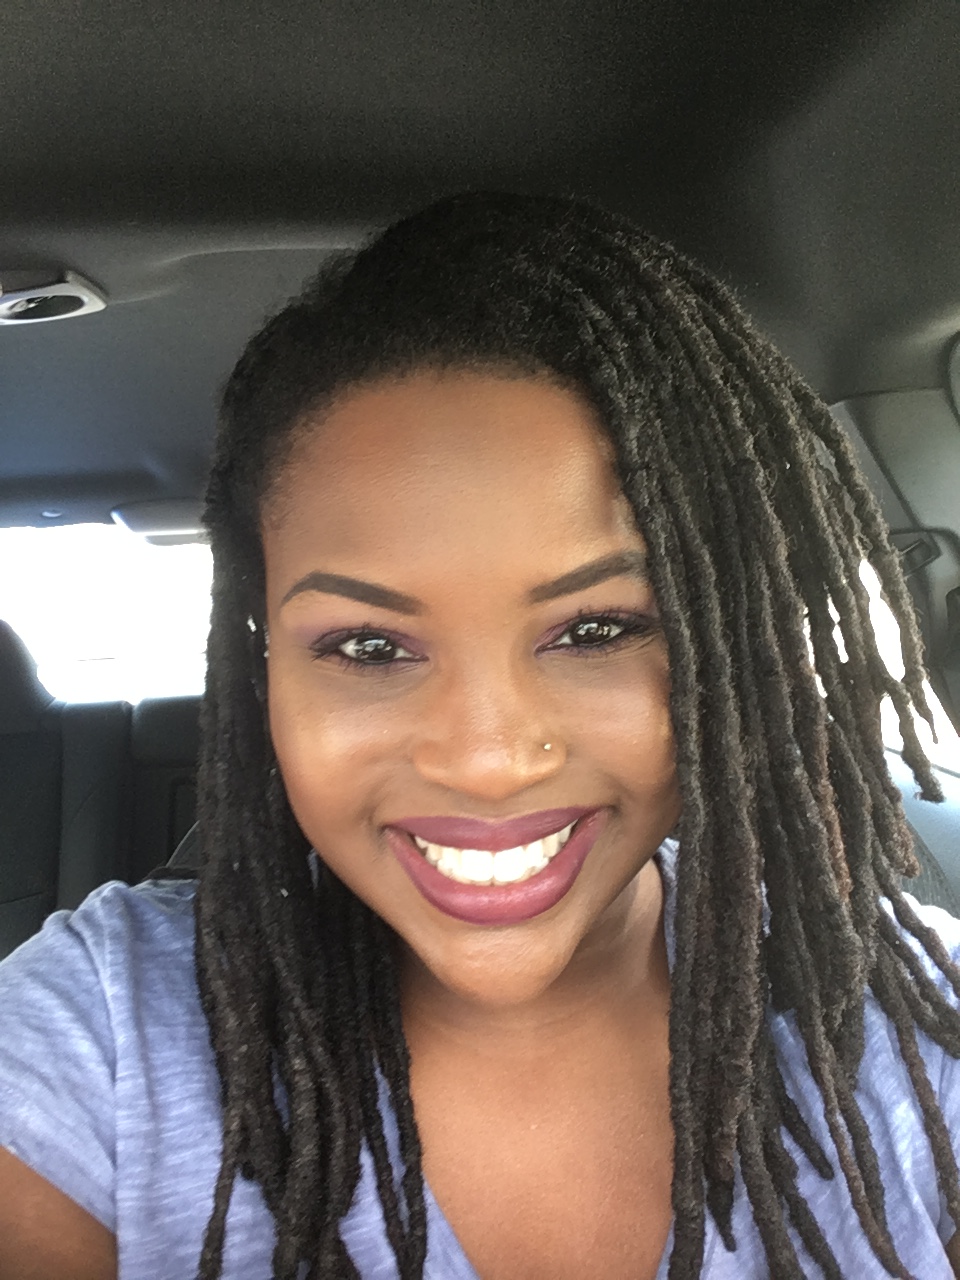
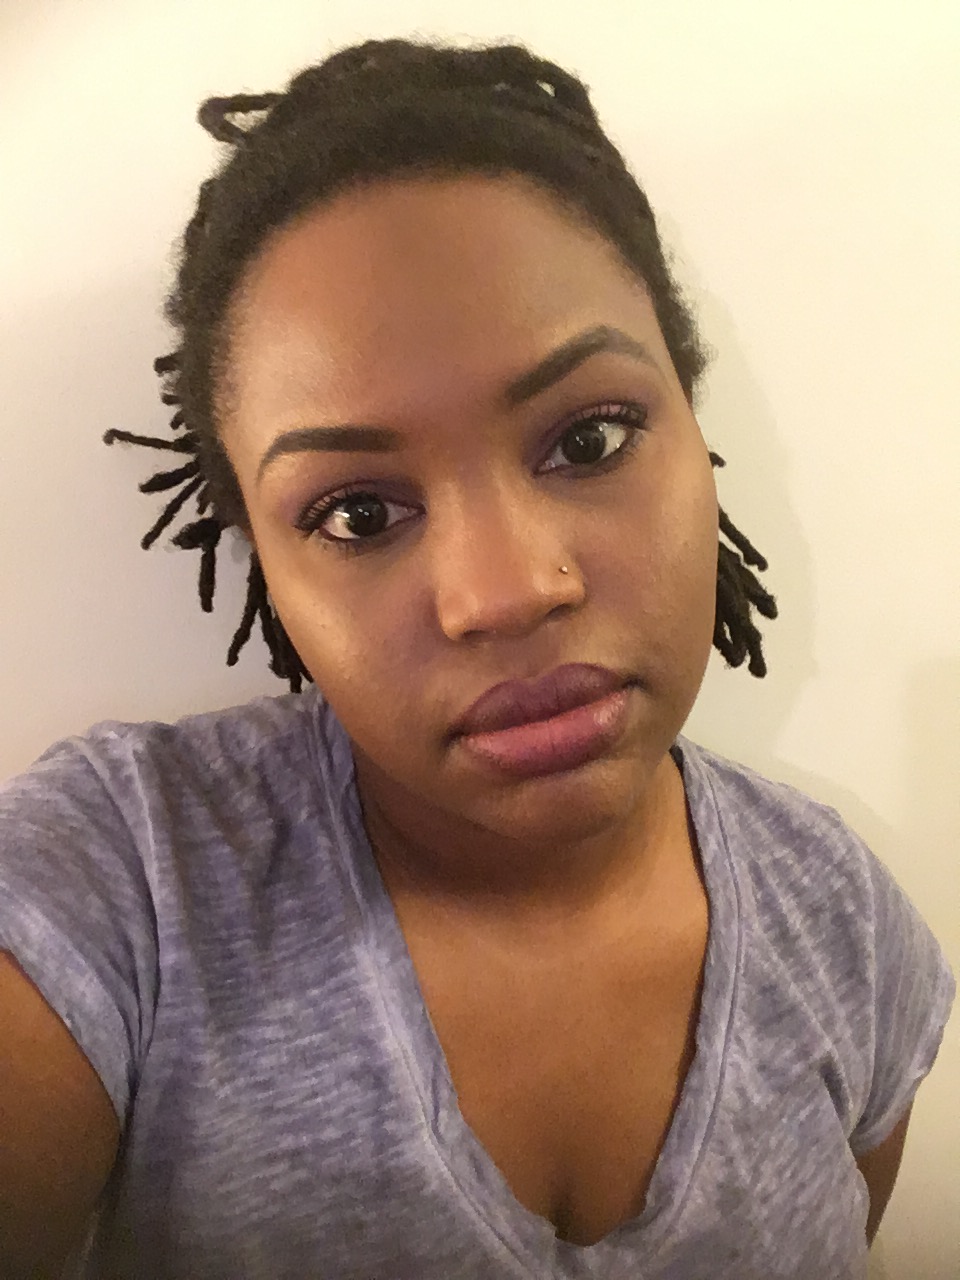
I am not sure this is what Jaclyn Hill intended but I felt like a badass all day. There is something about wearing products that you know work for you that makes you feel like the shit. And I mean that is usually how I feel anyway, but I digress… I took some cute pics of myself on the way to work! Here they are!

IMG_2399IMG_2347Image-1


I will save my brush favorites for another post, AND I was thinking of doing the “How I Did My Makeup in High School” Challenge. I think that one will be hella funnnnn. Thanks for reading, until next time!!!!

Sunset Mama Glitter!

Y’all. I always have like two back up posts written, because that’s the kind of bomb ass blogger I am. But sometimes I have to take pictures and that’s where I get lazy. Oop. But anyway, I am here to talk about a look I did and introduce you to a product that I am super proud of.

I love this blog and my beauty Instagram, I even dedicated a whole post to it. But I wanted to do more, sink my hands a little further in the beauty world. So, I decided the best way for me to do that was to make cosmetic glitters. I am not manufacturing the glitters in my home, but I am mixing crazy cool colors at my makeup table like a mad scientist.

I have three shades so far, but I am planning to do many more. They are up on my etsy store, GlamWizard, for 6.25 a piece and they are made to order. I am super excited, and will keep my blog family updated as I add more colors.

Now, on to the look I created. I used my glitter, Sunset Mama, named for a close friend of mine that loves sunsets and her son deeply. I am a vane person, not selfish…but vane. ANYWAY. My vanity causes me to be my toughest critic but I also acknowledge when I slay. And boy did I slayyyyy this look. The warm tones of the glitter were absolutely perfect for a fun summer look. I wore a nude lip because I rocked it in the day time, but I am sure you could vamp it up with a bolder lip for evening. I would do a ombre red lip. Correction. I WILL do an ombre red lip. All of the orange tones are from the Morphe 35O Palette. I have been drooling over the Anastasia Beverly Hills, Modern Renissance Palette and Sunset Mama would go with so many looks from that palette. (Sidenote: Isn’t it funny how the makeup obsessed will do anything to justify a purchase.)

Alright, I suppose we all want some evidence of the slay. Here goes…

IMG_1719
Fun.Silly.Glamourous. My tagline. Hehe.
IMG_1720
I was tryna be sultry. Did I do it?
IMG_1701
This is an actual swatch of the glitter, Sunset Mama.

Oh also! Go check out my beauty Facebook page, InconspicuousGlamour. Thanks for reading! Until next time!

Packing Makeup, The Saga

I am not a parent so I cannot be sure of this…but packing your makeup for a trip seems similar to a parent packing up all the things a child may need. This could quite possibly be an exaggeration, but I am almost certain that parents deciding what toys will keep the child occupied during a drive is similar to me choosing which eyeshadow palette to bring.

I wanted to sit down and right this to help me process what makeup I need to bring and as a form of procrastination. I DO NOT WANT TO PACK. Let it be known, I am going out of town for two days but I don’t know what lipstick mood I will be in on Saturday!!! I am going to Charleston, SC and spending lots of that time outside. So my makeup should be lightweight but my face still needs to be BEAT.

Here goes.

1. Primer. 9 times out of 10 I wear the same ones. My Nivea After Shave Balm and Porefessional by Benefit.

2. Foundation. I know that I need the Lancome Teinte Idole Foundation for coverage and longevity but my NARS All Day Luminous is so lightweight and comfortable to wear.

3. Contour and Highlight. This is a tough one, I know I should just take a palette. I have been really loving the Cover FX Cream Contour Kit. But I don’t think I will want to do a cream contour. I am gonna take it anyway and toss in the Kevyn Aucoin Sensual Skin Enhancer with the Bobbi Brown Bronzer  (just in case I don’t even feel like contouring).

4. Brows. Easy. Colourpop’s Brow Colour.

5. Eyes. I am gonna bring the Morphe 35O Palette and do some good neutral looks. Probably gonna end up throwing in some Colourpop single shadows for some pops of color.

6. Lips. Attempting to list these is a joke. I will take a couple nudes and some nice bright spring/summer shades.

7. Brushes. All of them. Duh. Or at least all of my main brushes. So, a lot of them.

FullSizeRender
These are the main face/complexion products I ended up with…plus a few others I threw in the bag.
IMG_1052-1
Here are the lip and eye products I ended up with, neutral eye looks are gonna be this weekends theme. 

Okay, let me see if I can condense this anymore than I have. Comment below with your travel must haves. Thanks for reading, Until next time!

Spring & Summer Makeup Routine

In my past two posts I have mentioned that I live in South Carolina. Its notoriously hot and humid here. In fact the tag line for my city is “Famously Hot”, and it is so so so accurate. Being that it is hot and humid here I have to take precautions to keep the oil and shine at bay.

It starts with a good base. I choose primers that fill my pores and reduce shine. My two favorites are the Smashbox Iconic Photo Finish Primer and Benefit’s Porefessional. Both of these keep my tzone looking flawless. For the perimeter of my face I use Nivea’s Sensitive Shave Balm. That stuff is magic, my contour and highlight don’t fade at all!

My summer foundation is the Lancome Teint Idole. It claims 24 hour wear, but I have worn it for upwards of nine to ten hours and it has lasted with only 1 to 2 touchups needed. I have been applying mine with a beauty blender and letting it set for a couple of minutes before I add my concealer highlight. It definitely appears tacky at first but once it has a moment to settle it leaves a nice soft matte finish.

The most crucial step in this process are the products use to set the makeup. I have mentioned all but two of them on my blog. I use Sacha Buttercup powder as if my life depended on it. I set all my highlighted areas with it. And sometimes if I am feeling a little extra, I will brush it away and apply an additional layer. For my whole face I use Koyvoca’s KV Classic Setting Powder. I reviewed their products in a previous post. I couldn’t ask for a better complexion product. I mean, it blends all my makeup together seamlessly and keeps my face oil free. AND THE COLOR MATCH 10/10! If you haven’t visited this brands site, please please do. It is well worth it. Lastly, I use the Smashbox Photo Finish Primer Water. This is the best setting spray I have tried. It takes away the powdery look and leaves a nice natural glow without any oilyness.

So here is my makeup like 15 minutes after I finished. Excuse the selfies, it was not an A1 selfie day and your girl was struggling. It was about 1130 am and already 86…yikes.

IMG_0738.JPG

This is about and hour and a half after the first photo. I got to hang out with my brother today but he merely tolerated me for these pictures. IMG_0759.JPG

IMG_0753.JPG

This was taken at 430pm. By this time there was some definite oiliness in my Tzone and my lipstick was due to be reapplied (popcorn) but I did not blot so y’all could see how the makeup stood up to the weather. We saw the new Captain America and there was so much goodness to look at. If y’all don’t care about the action or the story line please go for Chadwick Boseman (Black Panther) and Sebastian Stan (Winter Soilder).

IMG_0766.JPG

Alright. The last two. The first one was just me being adorable on snapchat. And this one is right before I took off my makeup. And I am so done with the day. It was extra humid here bc it rained a tad bit but the sun never seemed to go away. The high was 94!

IMG_0776.JPGIMG_0786.JPG

All things considered, I think my makeup did pretty well throughout the day. I am pleased with this routine I have developed. Comment below if you have any other suggestions or tell me what works for you! I hope this helped with your summer makeup routine! Thanks for reading! Until next time!!!

KOYVOCA Swatch and Review!

I am using March as my makeup hiatus. I am not buying any makeup and I truly feel like I am about to die. Am I being melodramtic? Absolutely. Do I even care? Absolutely not. Prior to this hiatus I ordered from Koyvoca, Makeup for Dark Skin. Its a black owned business based out of DC. The price range is great. I think the most expensive thing I saw on the site was 16 dollars. They make everything to order, so I had to wait a little minute before it showed up. I think I got it in about 12 days. And boy am I glad because my makeup heartache has been soothed for a couple of days.

I orderd the kv Classic Setting Powder in medium deep, the Hi-Life Highlighter in Liquid Gold, and the Contour Stick in Aphotic. Everything I ordered from Koyvoca is extremely pigmented! The highlighter holds true to the name. It is GOLD and gorgeous. When I first swatched it I literally had to catch my breath. The formula is super creamy and blends out beautifully. The contour stick was a bit difficult for me to move around on my face at first but, I am pretty sure thats because it was cold. Once it sat in my room for awhile and not in the cold mailbox it applied much better. The color was a true match to what I saw online.  And finally, the Setting Powder…I think this was by far my favorite product out of the bunch. It is finely milled and gives my makeup a beautiful finish and staying power. This is the first loose setting powder I have found with such great pigment and lasting power.

IMG_1104.jpg
From Left to right: Contour Stick in Aphotic,Hi-Life Highligher in Liquid Gold,kv Classic Setting Powder in medium deep
IMG_1105.jpg
These are the above products blended out.

I definitely have plans to order more things from Koyvoca. I really want to try their lipsticks. They have some beautiful nudes for people of color. The quality and price range is on point and supporting black owned businesses is important! Until next time!

Photos by Alexis Schwallier.